Benchmark results of Haxe cross-compilation against original Delaunay JS library (commit 4e6ecd4)
uniform 100k
gauss 100k
grid 100k
degen 100k
uniform 1 million
gauss 1 million
grid 1 million
degen 1 million
Original Lib
79ms
74ms
80ms
33ms
1.16s
1.17ms
1.02ms
0.34s
Haxe JS
69ms
65ms
67ms
37ms
1.06s
1.05s
0.93s
0.68s
Haxe C++
72ms
73ms
139ms
94ms
1.10s
1.06s
0.40s
0.62s
Haxe C#
80ms
79ms
71ms
56ms
1.16s
1.15s
0.95s
0.83s
Haxe Java
118ms
76ms
66ms
42ms
1.55s
1.41s
1.15s
0.94s
HashLink C
94ms
95s
86ms
69ms
1.38s
1.32s
1.16s
1.15s
HashLink JIT
203ms
197ms
207ms
146ms
2.63s
2.74s
2.52s
2.63s
Performance Comparsion Chart
Keep in mind
All these benchmark results depend on the hardware and moon phases.
This comparison was done just for fun and all of these Haxe targets including the original library are incredibly fast enough in the real world.
ProgpJS is a fast javascript engine for the Go language, using V8 as backend.
ProgpJS is “fast and fast”: fast to execute and fast to develop with, thanks to a code generator handling
the technical stuffs for you. You write a simple Go function, say under what name it must be exposed to javascript
and it’s all!
Benchmarks show that it’s way faster than Node.js and on par with BunJS and DenoJS. But what is great with ProgpJS
isn’t only his speed, but his capacity to easily mix Go code, C++ code and Javascript code, while been very simple to use.
With ProgpJS there isn’t technical complexity, nothing, ProgpJS takes in charge all the difficulties for you!
ProgpJS comes with a Node.js compatibility layer for projects needing it. It’s in the first stage, but it can be
useful for those needing it. The goal of ProgpJS isn’t to be compatible with Node.js, mainly because ProgpJS goal
is to make interact javascript and Go, it’s not a Node.js replacement. With Node.js your project is 100% javascript
while with ProgpJS you code your tools in Go (for his high speed) and you use your components through javascript.
More about ProgpJS
You can visit ProgpJS website in order to known more about the project. https://progpjs.dev
The ProDOS operating system for the Apple II executes the first .SYSTEM file found in the boot directory on startup. A common pattern is to have the boot directory contain several “driver” files that customize ProDOS by installing drivers for hardware or modify specific parts of the operating system. These include:
Early versions of these drivers would often invoke a specific file on completion, sometimes user-configurable. The best versions of these drivers simply execute the following .SYSTEM file, although this is non-trivial code and often did not work with network drives.
This repository collects several drivers and uses common code to chain to the next .SYSTEM file, supporting network drives.
What is present here?
This repo includes the following drivers/modifications:
Real-time Clock drivers
No-Slot Clock
The Cricket!
Applied Engineering DClock
ROMX Real-Time Clock
FujiNet Clock
A “jumbo” driver that includes all of the above (just called CLOCK.SYSTEM)
Accelerators
ZIP CHIP configuration (slow on speaker access, make slots 1-4 fast)
RAM Disk drivers
RamWorks Driver by Glen E. Bredon
Quit dispatcher/selector (BYE routines)
40-column Selector (from ProDOS)
80-column menu-driven Selector (from ProDOS 1.9 and 2.x)
Bird’s Better Bye (a 40-column menu-driven selector)
Buh-Bye (an enhanced version of the ProDOS 80-column, menu-driven selector)
Text color themes
These set the IIgs (or VidHD) text/background/border colors
In addition, QUIT.SYSTEM is present which isn’t a driver but which immediately invokes the QUIT handler (a.k.a. program selector). This will happen automatically if the last driver can’t find another .SYSTEM file, but QUIT.SYSTEM can be used to stop the chain if you have other .SYSTEM files in your root directory.
If you don’t have a real-time clock, NOCLOCK.SYSTEM will prompt you for the date/time on boot and set the ProDOS date/time, which will be used to record file creation/modification times.
There’s also PAUSE.SYSTEM which just waits for a fraction of a second before invoking the next driver file in case the log messages from the other installers goes by too fast for your taste, and HOME.SYSTEM in case you want the log messages to start off with a blank screen.
Non-drivers that are included:
The DATE binary file can be BRUN (or just -DATE) to show the current ProDOS Date/Time, to verify that the clock driver is working.
Some utilities for The Cricket! clock are also included.
How do you use these?
The intent is that you use a tool like Copy II Plus or Apple II DeskTop to copy and arrange the SYSTEM files on your boot disk as you see fit. A boot disk image catalog that is used on multiple different hardware configurations might include:
NS.CLOCK.SYSTEM – install No-Slot clock driver, if present
ROMXRTC.SYSTEM – install ROMX clock driver, if present
FN.CLOCK.SYSTEM – install FujiNet clock driver, if present
DCLOCK.SYSTEM – install DClock clock driver, if present
CRICKET.SYSTEM – install The Cricket! clock driver, if present
ZIPCHIP.SYSTEM – slow the ZIP CHIP on speaker access, if present
RAM.DRV.SYSTEM – install RamWorks RAM disk driver, if present
BUHBYE.SYSTEM – install a customized Quit handler to replace the built-in one
PAUSE.SYSTEM – pause for a moment, so that you can inspect the output of the above
QUIT.SYSTEM – invoke the Quit handler immediately, as a program selector
BASIC.SYSTEM – which will not be automatically invoked, but is available to manually invoke
Alternately, you might want to install some drivers then immediately launch into BASIC. In that case, put BASIC.SYSTEM after the drivers in place of QUIT.SYSTEM.
Alternate Approach
If you want to keep your volume directory tidier, consider using SETUP.SYSTEM instead.
This collection of scripts for AppVeyor CI can be used with the following appveyor.yml file:
platform:
- x86
- x64environment:
matrix:
# Add here environement variables to control the AppVeyor CI buildinstall:
- git clone https://github.com/StatisKit/appveyor-ci.git appveyor-ci
- cd appveyor-ci
- call install.batbefore_build:
- call before_build.batbuild_script:
- call build_script.batafter_build:
- call after_build.batdeploy:
provider: Scripton:
branch: masterbefore_deploy:
- call before_deploy.batdeploy_script:
- call deploy_script.batafter_deploy:
- call after_deploy.baton_success:
- call on_success.baton_failure:
- call on_failure.baton_finish:
- call on_finish.bat
In the matrix section of the environment section, you can use the following environement variables to control the Appveyor CI build:
CONDA_VERSION equal to 2 (default) or 3.
Control the Conda version used for the build.
If you want to:
Build a Conda recipe, you should define these environment variables:
CONDA_RECIPE.
The path to the Conda recipe to build.
This path must be relative to the repository root.
ANACONDA_LOGIN (optional).
The usename used to connect to the Anaconda Cloud in order to upload the Conda recipe built.
ANACONDA_PASSWORD (optional).
The usename’s password used to connect to the Anaconda Cloud in order to upload the Conda recipe built.
ANACONDA_OWNER (optional).
The channel used to upload the Conda recipe built.
If not given, it is set to the ANACONDA_LOGIN value.
ANACONDA_DEPLOY (optional).
Deployment into the Anaconda Cloud.
If set to True (default if ANACONDA_LOGIN is provided), the Conda recipe built will be deployed in the Anaconda Cloud.
If set to False (default if ANACONDA_LOGIN is not provided), the Conda recipe built will not be deployed in the Anaconda Cloud.
ANACONDA_LABEL equal to main by default.
Label to associate to the Conda recipe deployed in the Anaconda Cloud.
Run a Jupyter notebook, you should define these environment variables:
JUPYTER_NOTEBOOK.
The path to the Jupyter notbook to run.
This path must be relative to the repository root.
CONDA_ENVIRONMENT.
The path to the Conda environment to use when runnning the Jupyter notebook.
Note
It is recommanded to define the environment variables ANACONDA_LOGIN (resp. DOCKER_LOGIN), ANACONDA_PASSWORD (resp. DOCKER_PASSWORD) and ANACONDA_OWNER (resp. DOCKER_OWNER) in the Settings pannel of Travis CI instead of in the appveyor.yml.
Profile Classification Modelling is a scientific analysis approach based on vertical profiles classification that can be used in a variety of oceanographic problems (front detection, water mass identification, natural region contouring, reference profile selection for validation, etc …).
It is being developed at Ifremer/LOPS in collaboration with IMT Atlantique since 2015, and has become mature enough (with publication and communications) to be distributed and made publicly available for continuous improvements with a community development.
Ocean dynamics and its 3-dimensional structure and variability is so complex that it is very difficult to develop objective and efficient diagnostics of horizontally and vertically coherent oceanic patterns. However, identifying such patterns is crucial to the understanding of interior mechanisms as, for instance, the integrand giving rise to Global Ocean Indicators (e.g. heat content and sea level rise). We believe that, by using state of the art machine learning algorithms and by building on the increasing availability of ever-larger in situ and numerical model datasets, we can address this challenge in a way that was simply not possible a few years ago. Following this approach, Profile Classification Modelling focuses on the smart identification of vertically coherent patterns and their spatial distribution.
References:
Maze, G., et al. Coherent heat patterns revealed by unsupervised classification of Argo temperature profiles in the North Atlantic Ocean. Progress in Oceanography, 151, 275-292 (2017) http://dx.doi.org/10.1016/j.pocean.2016.12.008
Maze, G. A Profile Classification Model from North-Atlantic Argo temperature data. SEANOE Sea scientific open data edition. http://doi.org/10.17882/47106
TOML is a configuration file grammar for humans. It is easier to read and
edit than the alternatives yet arguably more useful as it is strongly typed: values come back as
integer, double, (multiline-) character (strings), boolean or Datetime. Moreover, complex nesting
and arrays are supported as well.
For several years, this package used the C++11 library
cpptoml written by Chase
Geigle. However, as that library is no longer maintained, current
versions now use the newer C++17 library toml++ by Mark
Gillard.
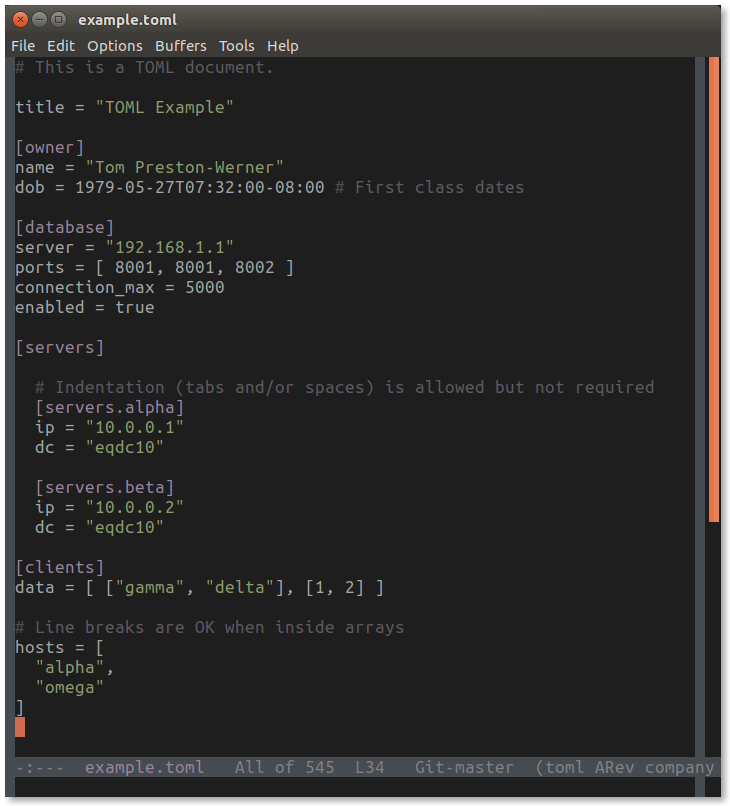
# This is a TOML document.title = "TOML Example"
[owner]
name = "Tom Preston-Werner"dob = 1979-05-27T07:32:00-08:00# First class dates
[database]
server = "192.168.1.1"ports = [ 8001, 8001, 8002 ]
connection_max = 5000enabled = true
[servers]
# Indentation (tabs and/or spaces) is allowed but not required
[servers.alpha]
ip = "10.0.0.1"dc = "eqdc10"
[servers.beta]
ip = "10.0.0.2"dc = "eqdc10"
[clients]
data = [ ["gamma", "delta"], [1, 2] ]
# Line breaks are OK when inside arrayshosts = [
"alpha",
"omega"
]
It can be read in one statement and once parsed, R now has properly typed input as shown in
default print method:
See the other examples and the upstream documentation for more.
Also note that most decent editors have proper TOML support
which makes editing and previewing a breeze:
Installation
Installation from source requires a C++17 compiler, and g++ versions 8 and onward should suffice.
From CRAN
The package is on CRAN and can be installed
from every mirror via
install.packages("RcppTOML")
From the ghrr-drat
Development releases may be provided by the
ghrr repository which can accessed via
## if needed, first do:  install.packages("drat")
drat::addRepo("ghrr")
after which install.packages("RcppTOML) which access this repo.
Alternatively, set the repo information on the fly as e.g. in
which points to the ghrr repository as well as a standard CRAN
mirror, but just for the length of this installation step.
Status
Earlier versions relied upon cpptoml and were feature-complete with
TOML v0.5.0 (see the
tests/ directory). They already parsed
everything that the underlying cpptoml parsed with the same
(sole) exception of unicode escape characters in strings.
Since switching to toml++ the package takes advantage of its comprehensive TOML v1.0.0 support and should now be fully 1.0.0 compliant. Some new tests were added to demonstrate this.
As toml++ also offers export to JSON and YAML as well as
TOML writing, we may add support to some of these features going forward.
Continued Testing
As we rely on the tinytest package, the
already-installed package can also be verified via
This project is part of the Data Engineering Nanodegree program, from Udacity. I manipulate data for a music streaming app called Sparkify, where I use Apache Airflow to introduce more automation and monitoring to their data warehouse ETL pipelines.
I create data pipelines that are dynamic and built from reusable tasks, can be monitored, and allow easy backfills. I also implement tests against the datasets after the ETL steps have been executed to catch any discrepancies in the database.
The source data resides in S3 and needs to be processed in a data warehouse in Amazon Redshift. The source datasets consist of JSON logs that tell about user activity in the application and JSON metadata about the songs the users listen to.
Install
To set up your python environment to run the code in this repository, start by
creating a new environment with Anaconda and install the dependencies.
In a terminal or command window, navigate to the top-level project directory (that contains this README). You need to set up a Redshift cluster. So, start by renaming the file confs/dpipe.template.cfg to confs/dpipe.cfg and fill in the KEY and SECRET in the AWS section. Then, run the following commands:
The above instructions will create the IAM role, the Redshift cluster, and check the status of this cluster every 15 seconds. Fill in the other fields from your dpipe.cfg that shows up in the commands console outputs. After Amazon finally launch your cluster, run:
The first command opens a TCP port to your cluster so that you can manipulate data from outside. The second command sets your AIRFLOW_HOME to the airflow/ folder in the current project. Some errors will show up, don’t worry. The third command sets the required variables and connections, as the Redshift host address and AWS key. The last command starts the airflow UI.
Then, navigate to http://localhost:3000 in your browser and turn on the etl_dag. It will create all the tables and insert data from S3 to the staging, dimension, and fact tables. You can click in the DAG name to follow the process execution steps. Finally, CLEAN UP your resources using the commands below:
ft_tools::FtParameters ft_parameters
// Load parameters from YAML file (absolute path)const std::string filename("...")
bool ok = ft_parameters.from_yaml(filename);
// or from a config folderbool ok = ft_parameters.from_yaml(config_filename, config_package);
from a msg:
// Get calibration msg (typically from a service call)// i.e., ft_msgs::srv::FtCalibration ft_parameters_msg;
ft_tools::FtParameters ft_parameters
bool ok = ft_parameters.from_msg(ft_parameters_msg);
The parameters can likewise be written to dump to a yaml file or sent as a msg.
FT calibration
The ft_tools::FtCalibration implements a simple sensor calibration method [1] using a least square regression (i.e., eigen SVD solver).
We are given N sets of measurements $\left( g, f, \tau \right)$ expressed in the sensor frame of reference where $g \in \mathbb{R}^3$ is the (signed) gravity and $f, \tau \in \mathbb{R}^3$ are the raw force and torque, respectively.
We want to retrieve the F/T sensor calibration that consists in
the mass $m$ in Kg
the center of mass $c \in \mathbb{R}^3$ in m
the force offset $f_0 \in \mathbb{R}^3$ in N
the torque offset $\tau_0 \in \mathbb{R}^3$ in N.m
If enough measurements were provided (i.e., about 10 well-chosen robot poses), the different parameters are identified using a least square regression (i.e., eigen SVD solver) such that
$$ f_\text{meas} = -mg + f_0 \text{ and } \tau_\text{meas} = -mc \times g + \tau_0$$
This process returns a ft_tools::FtParameters object.
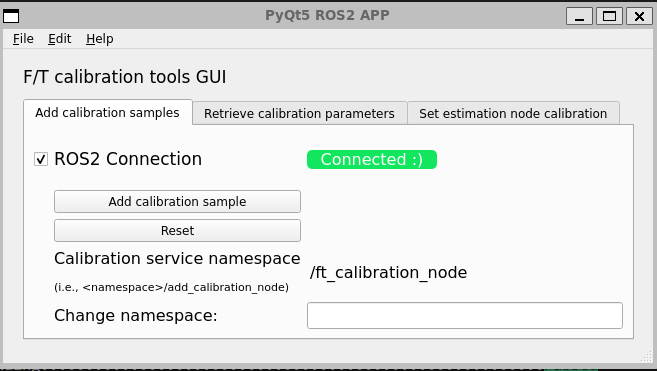
Although everything can be done from RQT (i.e., using the service caller), a basic GUI is provided for convenience.
Note that the GUI only has limited features and is overall not very robust to mishandling…
Perform calibration
Edit namespace service if needed;
Click on ROS2 Connection to initialize ROS2 communication (i.e., rclpy init, register services, etc.);
Click on Add calibration sample to call the service ~/ft_calibration_node/add_calibration_sample each time the robot is in position.
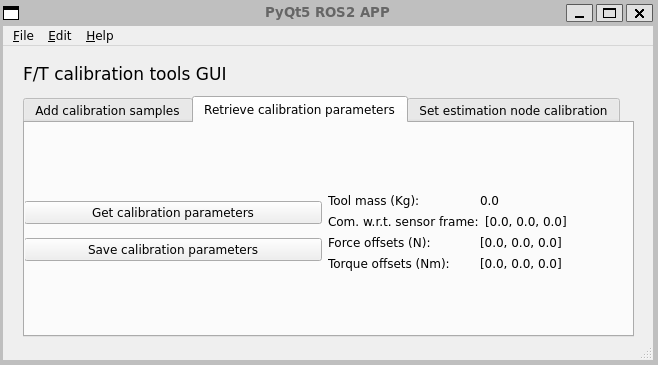
Retrieve calibration parameters
Once enough samples have been collected, go to the second tab of the GUI (see below) and click on Get calibration or Save calibration to call, respectively, the services:
~/ft_calibration_node/get_calibration
~/ft_calibration_node/save_calibration
Also, the Get calibration button will retrieve the estimated calibration parameters and display them in the GUI.
N.B., if the calibration files is updated, the service ft_estimation_node/reload_calibration must be called to refresh.
(optional) Run calibration GUI
source install/local_setup.bash
ros2 run ft_gui ft_calibration_gui
Move robot with moveit rviz2 plugin and use GUI to perform calibration
F/T calibration during comanipulation
TODO
Wrench estimation for Cartesian admittance control
TODO
References
[1] D. Kubus, T. Kroger and F. M. Wahl, “On-line rigid object recognition and pose estimation based on inertial parameters,” 2007 IEEE/RSJ International Conference on Intelligent Robots and Systems, 2007, pp. 1402-1408, doi: 10.1109/IROS.2007.4399184.
This application will serve as an Email and Message Board reader for use mainly
with BBS services. Currently working on setting up build/release automation.
Starting this as a project as most qwk and nntp readers generally suck and/or
are antiquated. Thunderbird is all but completely unusable with NNTP +
Synchronet and QWK Readers are also somewhat dated, and I found multimail didn’t
work correctly for me out of the box.
I want a GUI based message reader for BBS message boards with a modern UI/UX.
I’m using Rust on the backend to learn the language, and because I think it’s a
good choice, generally speaking. I’m using Tauri with a browser based UI because
I’m very comfortable with browser based UI/UX and want to reduce the friction on
the UI from what I will experience in learning the backend.
I will make a best effort to write clear, discoverable code. This project may or
may not follow best practices. On the backend, because I’m learning as I go.
On the frontend, because I’m probably going to be taking shortcuts as a faster
path to done.
I probably won’t try to integrate into any release prospects until after I have
an MVP of NNTP and Email (SMTP/POP) at the very least. I will be testing this
against my own BBS, which runs Synchronet. I may also create extended support
for some services specifically with Synchronet (ANSI User Icons and Polls).
Longer term, after MVP, but before enhanced rendering I will make an effort to
get updating releases into the various stores for OS use… I will likely limit
Linux to Flathub and possibly Snapcraft, but unlikely to do any distro
integration beyond this.
TODO
High level TODO list. Note: Anything before 1.0 can have breaking changes at any
time regardless of the version.
Release Tracking (release-please)
React + MUI front end
BBS Configuration Entry
Communication to/from Rust backend
Save/Load BBS Configuration Entries
Figure out settings/data path(s)
SQLite in Rust
NNTP Group List
NNTP Group Subscribe
NNTP Fetch Headers/Bodies
Display Message List (flat)
Classic 3-pane layout
Groups/Forums on left
Message List on upper-right
Message+Header lower-right
Display Message Header
Display Message (flat/plain text)
Purge Old/Read Support
Database vaccuum
Github Release Binaries (0.5.x)
Windows
x86_64 (msi, exe)
x86_64 offline (include web component, large) (msi, exe)
Mac
x86_64 (dmg, .app.tgz)
aarch64 (dmg, .app.tgz)
Linux
x86_64 AppImage
x86_64 .deb
armv7 AppImage
armv7 .deb
aarch64 AppImage
aarch64 .deb
Automated updates (0.6.x)
E-Mail (smtp/pop) (0.7.x)
Enhanced rendering (ansi/colors, etc) (0.8.x)
MVP Release v1.0
automated updates
Will test in v0.9.x and Push 1.0 when working/tested


 This is the original code for PCM used in
 -brightgreen.svg” alt=”” class=”wp-image-125″/></figure>
<figure class=)


-brightgreen.svg” style=”max-width: 100%;”></a>
<a href=)