Constraint-Based Automated Updating of Application Deployment Models
This repository contains the prototype for the bachelor thesis
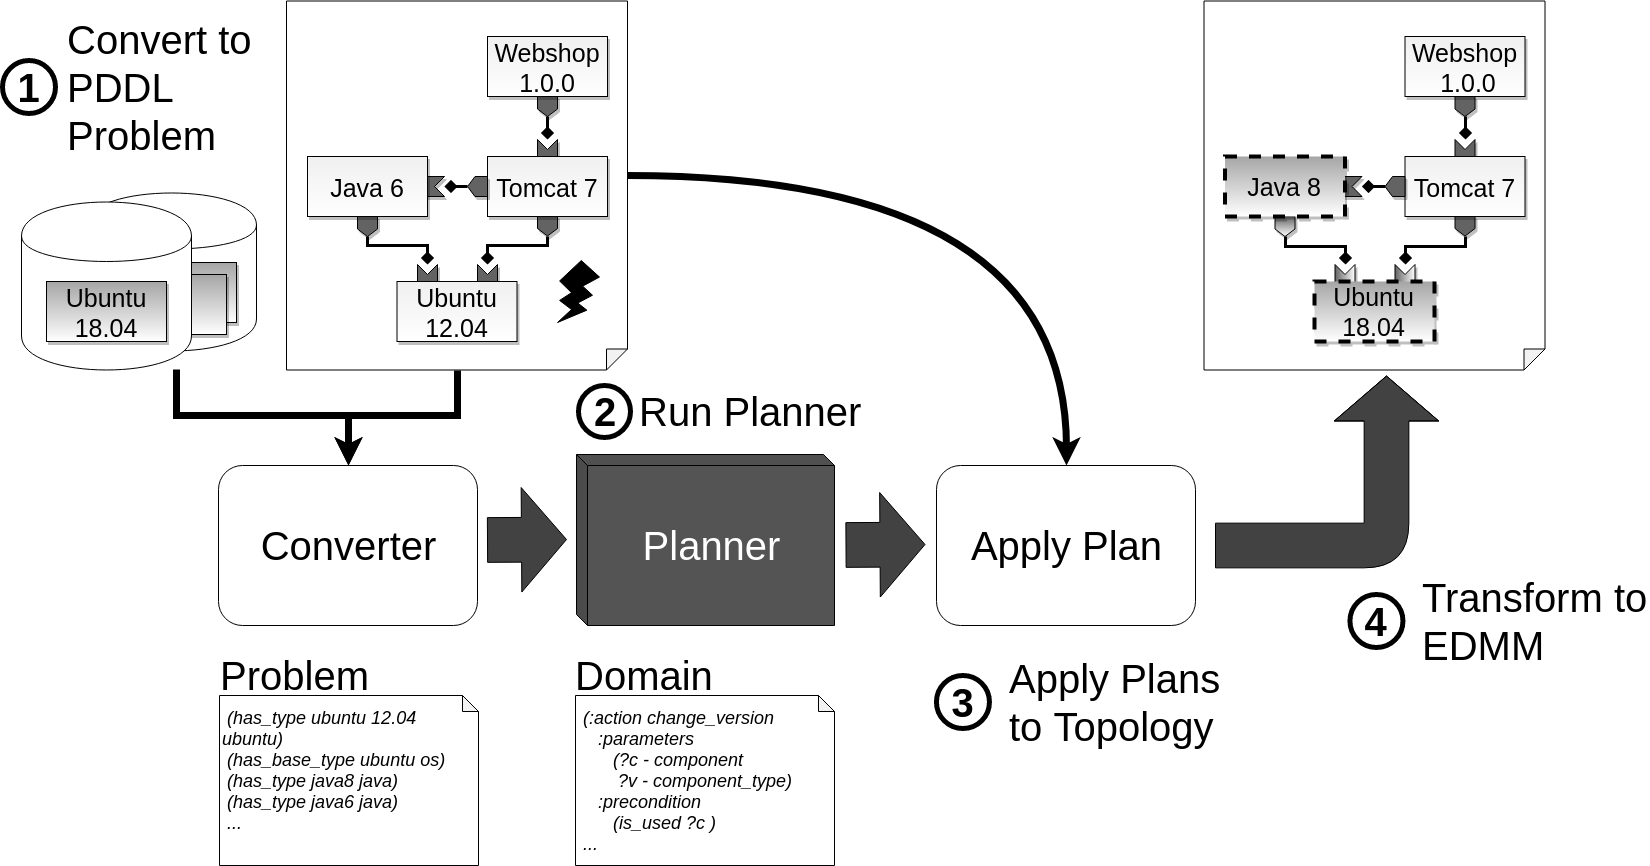
“Constraint-Based Automated Updating of Application Deployment Models”
The motivating scenario in the thesis is included in the edmm/ folder and will be run by default.
Overview
The approach converts an Essential Deployment Meta Model to a PDDL problem which is then solved by a planner. The domain ensures that the model is deploy able and the goal state tells the planner which components to update. Many deployment models can be converted to EDMM by using a converter. However, this prototype can easily be changed to import different deployment models in the future.
Setup
This project uses a planner to update deployment models. As of right now,
Fast Downward and Marvin are supported. The path to the executables has to be specified in the config.ini file.
The prototype can not be run without a planner!
The script analyzer/commandline_wrapper.py is able to analyze outputs of the following planners: Jasper and Fast Downward. Support for Marvin might be added in the future.
Usage
The analyzer can be used by piping the output to the script. Example: cat output_file | python3 commandline_wrapper.py. Multiple outputs of different planners can be merged in a single file. But above each output a line has to be added which tells the analyzer what kind of planner has produced the output.
Example for a single Fast Downward output:
<<<<FD>>>>
INFO     Running translator.
INFO     translator stdin: None
...
Usually in a database, entities are represented by a row in a table, when this row is updated the old information is
overwritten. The temporal model allows data to be referenced in time, it makes it possible to query the state of an
entity at a given time.
For example, say you wanted to keep track of changes to products so when an order is placed you know the state of the
product without having to duplicate data in the orders table. You can make the products temporal and use the time of
the order to reference the state of the ordered products at that time, rather than how they currently are, as would
happen without using temporal data.
The temporal model could also be used for auditing changes to things like wiki pages. Any changes would be
automatically logged without having to use a separate log table.
The model itself must use the Temporal trait and define two protected properties as in this example:
class Commission extends Model
{
use Temporal;
protected$dates = ['valid_start', 'valid_end'];
protected$temporalParentColumn = 'representative_id';
}
The $temporalParentColumn property contains the name of the column tying the temporal records together. In the example above the model would represent a commission rate. Its $temporalParentColumn might be ‘representative_id’. A representative/salesperson would have only one active commission rate at any given time. Representing the commission in a temporal fashion enables us to record history of the commission rate and schedule any future commission rates.
Usage
Creating Temporal Records
When a temporal record is created it automatically resolves any scheduling conflicts. If a newly created record overlaps with a previously scheduled record then the previously scheduled record will be deleted. Any records already started will have their valid_end set to the valid_start of the newly created record. Temporal records cannot be created in the past.
Updating Temporal Records
In order to preserve their historic nature, updates to temporal records are restricted to just valid_end after
they have started. Attempts to update any other fields will fail. If this behavior is undesirable, it can be modified by adding the following property to the temporal model:
protected$enableUpdates = true;
Additionally, the behavior can be changed dynamically by calling $model->enableUpdates()->save();
Deleting Temporal Records
Temporal records that have already started cannot be deleted. When the delete method is called on them they will simply
have their valid_end set to the current time. If delete is called on a scheduled record then it will succeed.
Methods and Scopes
The Temporal trait includes an isValid() method that optionally takes a Carbon object. The method returns whether the
model was valid on the provided date or now if no Carbon object is provided. Also included are valid() and invalid()
scopes. These scopes query for either the valid or invalid scopes at the time of the passed Carbon object or now if no Carbon object is passed.
The event handler class is the main instance which handles listening and emitting of events.
EventHandler
The following methods are exposed on the event handler:
on(string: eventName, function: listener, number: priority = 0, boolean: once = false): number
The on method attaches a callback to the handler which will be fired once the given event is emitted by the handler.
It’s possible to set a priority on the callback by changing the priority number value, where 0 is lowest priority. The once argument
determines if the callback should be removed after first run or not and defaults to false.
The method returns a handle id (number) which can be used to remove the event listener if wanted.
If the listener callback returns FALSE, the event will not bubble to the next handler.
once(string: eventName, function: listener, number: priority): number
The once method does pretty much the same as on, but is always a fire once listener type.
The emitAsync method works just like the Emit method, with the exception that it is an async method.
When used, it will group all the listeners by their priority and call them in batches, and just as with emit, if
one of the callback returns false, it will not call the next batch.
It uses the Promise.allSettled function – by default – which does not throw exceptions from the listeners.
If the throw parameter is passed, it will instead use all which will throw exceptions from the listeners.
Event
When emitting a event, the Event class is used as a object which passes the data. It accepts a data object, which can be accessed
via the exposed data getter and an optional callee argument which can be used to pass information (or a reference) to the calling object.
Example
The following example shows the most simple way create a handler and a listener and emit an event.
import{EventHandler,Event}from'@jitesoft/events';consthandler=newHandler();handler.on('test-event',(event)=>{console.log(event.data.message);});handler.emit('test-event',newEvent({message: 'This is a simple example...'}));
License
MIT License

Copyright (c) 2018 Jitesoft

Permission is hereby granted, free of charge, to any person obtaining a copy
of this software and associated documentation files (the "Software"), to deal
in the Software without restriction, including without limitation the rights
to use, copy, modify, merge, publish, distribute, sublicense, and/or sell
copies of the Software, and to permit persons to whom the Software is
furnished to do so, subject to the following conditions:

The above copyright notice and this permission notice shall be included in all
copies or substantial portions of the Software.

THE SOFTWARE IS PROVIDED "AS IS", WITHOUT WARRANTY OF ANY KIND, EXPRESS OR
IMPLIED, INCLUDING BUT NOT LIMITED TO THE WARRANTIES OF MERCHANTABILITY,
FITNESS FOR A PARTICULAR PURPOSE AND NONINFRINGEMENT. IN NO EVENT SHALL THE
AUTHORS OR COPYRIGHT HOLDERS BE LIABLE FOR ANY CLAIM, DAMAGES OR OTHER
LIABILITY, WHETHER IN AN ACTION OF CONTRACT, TORT OR OTHERWISE, ARISING FROM,
OUT OF OR IN CONNECTION WITH THE SOFTWARE OR THE USE OR OTHER DEALINGS IN THE
SOFTWARE.
Terraform module which creates Yandex Cloud Address resources.
Examples
Examples codified under
the examples are intended
to give users references for how to use the module(s) as well as testing/validating changes to the source code of the
module. If contributing to the project, please be sure to make any appropriate updates to the relevant examples to allow
maintainers to test your changes and to keep the examples up to date for users. Thank you!
Waiting for connections!
Writing!
Half-time break!
Break over!
[    3.335716] ERR:  [libkvmvirtio] <virtio_ring.c @  348> Available descriptor:0, Request2
[    3.338315] ERR:  [libkvmvirtio] <virtio_ring.c @  348> Available descriptor:0, Request2
Written everything!
Client served!
Waiting for connections!
This is a minimal server-client setup.
The server transmits 128 MiB to the client.
In the middle of the transmission, the server makes a short break.
Then the transmission continues, resulting in the error.
The error relies on a race condition.
It may trigger more or less often depending on:
The size of the unikernel (e.g. adding musl to the binary makes it more frequent).
The size of the buffer (bigger transmissions tend to cause errors more reliable).
The pause (without pauses inbetween transmissions, the error won’t show up).
The speed of the QEMU network device (user mode emulation does not show the error, TAP devices do).
How to Reproduce
Make sure to check out the submodules for Unikraft and lwIP sources.
DotWhitespace is an esoteric programming language created by Max Base. It was released on July 17, 2020. Its name refers to the characters of white space and dots. Unlike most programming languages, which ignore most white space characters or give less meaning. Only distances, tabs, dots and lines are meaningful.
This Streamlit app detects and classifies 60+ animal species using computer vision techniques and the YOLO object detection model.
Features
Real-time Detection: Detects and classifies a wide range of animal species in real-time using images or videos.
Animal Classification: Animals are classified into categories such as mammals, birds, reptiles, amphibians, fish, and invertebrates.
Upload Functionality: Users can upload images or videos (supported formats include jpg, jpeg, png, and mp4) for analysis.
Display of Detected Animals: For each detected animal, the app shows the species and confidence score (accuracy of detection).
User-friendly Interface: The app includes a sidebar that lists the possible animal classes for easy reference.
Installation
To run this app, you need to have Python installed. You can install the required packages using pip and the provided requirements.txt file:
Streamlit Animal Species Detection App
This Streamlit app is designed for detecting and analyzing various animal species using computer vision techniques. It employs the YOLO (You Only Look Once) object detection model to identify different animal species in uploaded images or videos.
Features
Real-time species Detection: The app performs real-time detection of animal species such as mammals, birds, reptiles, amphibians, fish, and invertebrates.
Species Classification: Detected species are categorized and displayed with their respective confidence scores (accuracy of detection).
User Interface: The app features a user-friendly interface with sidebar navigation for different animal classes, making it easy to explore and analyze results.
Upload Functionality: Users can upload images or videos (supported formats include jpg, jpeg, png, and mp4).
Installation
To run this app, you need to have Python installed. You can install the required packages using pip and the provided requirements.txt file:
pip install -r requirements.txt
Usage
Clone this repository:
git clone https://github.com/mehulnaik16/Animal_Species_detection_Streamlit.git
cd Animal_Species_detection_Streamlit
Install the required packages:
pip install -r requirements.txt
Run the Streamlit app:
streamlit run app.py
You can create a virtual environment (Better Option) or directly run code
You can create a custom theme or choose one of the small selection of built-in themes (including rainbow mode!)
Two of the built-in themes are the “LAUSD Dark Blue” and “LAUSD Orange” themes which restore the interface to the new and old versions of the LAUSD theme respectively including the logo)
For non-LAUSD schools, an auto-generated theme will be created to match your school’s default theme
Custom themes can change colors throughout the interface as well as the logo and course icons. Custom themes can even use custom rainbow color patterns!
To learn more about creating custom themes, see Theme Editor
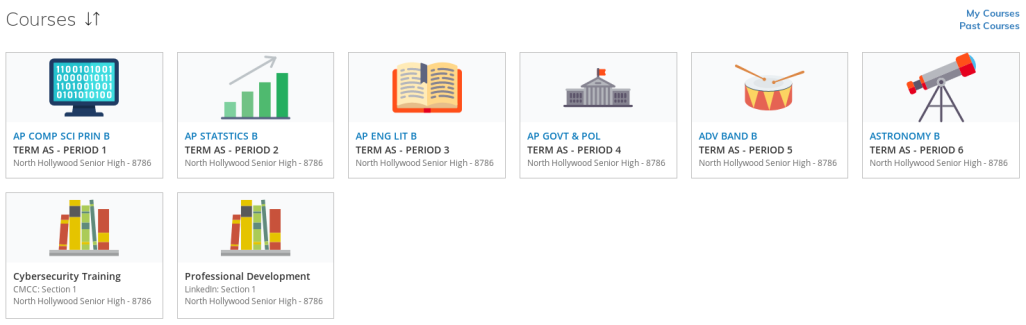
Course Icons
Image: Example of built-in course icons
Built-in course icons for many courses* (LAUSD schools only)
Custom themes can also introduce custom icons for courses
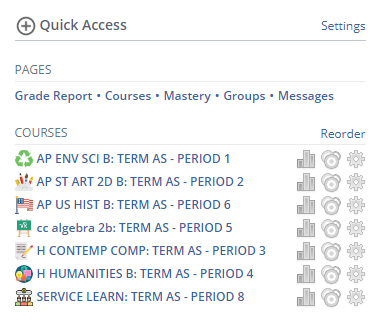
Quick Access
Image: Example of the Quick Access pane on the homepage
Quick Access panel on the right sidebar on the homepage with one-click access to important pages*
Links for grade report, courses, mastery, and more
Each class has a link to its home page, grades page, and mastery page
Click the icons next to each course to access its specific pages
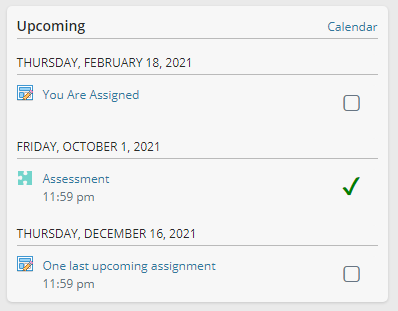
Check Marks for Submitted Upcoming Assignments
Image: Upcoming assignments with check marks
By default, green check marks ✔ are shown on all assignments you’ve submitted*
You can also manually check off assignments as you complete them
There are also options for putting a strikethrough through the assignment title or hiding the assignments completely.
Tooltips
Image: Demonstration of material tooltips
Toolips for items on the materials page show previews
Assignments show score and grade category
PDF files show previews and number of pages
Courses In Common
Image: Dialog box showing courses in common with another classmate
View all courses you share with a classmate by visiting their profile page
Miscellaneous Interface Improvements
Adds a button to quickly jump to archived courses in the Courses drop-down list*
Adds option to hide the upcoming and overdue assignments sidebars on the home page*
Indicates when a class is graded on a weighted scale*
Changed the courses drop down menu to show 6 courses across instead of 4
Notice when submitting a quiz when questions are left blank
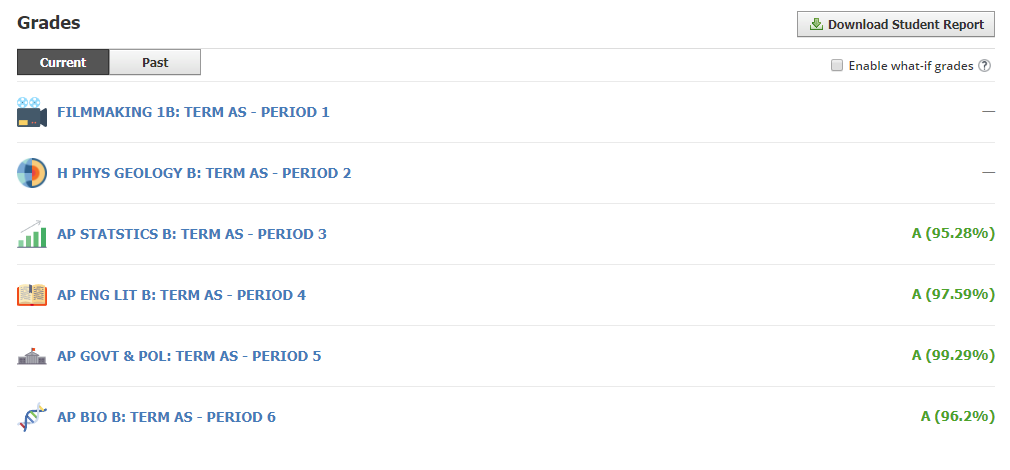
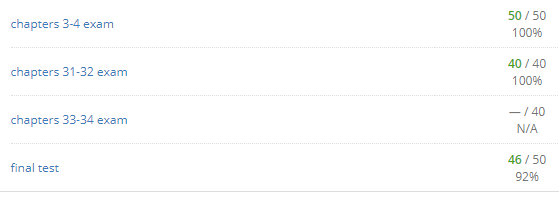
Grades Page Improvements
Miscellaneous Grades Page Improvements
Image: Example of the grades page showing grades for collapsed courses.
Classes are sorted by period* (LAUSD schools only)
Grades are displayed when classes are collapsed
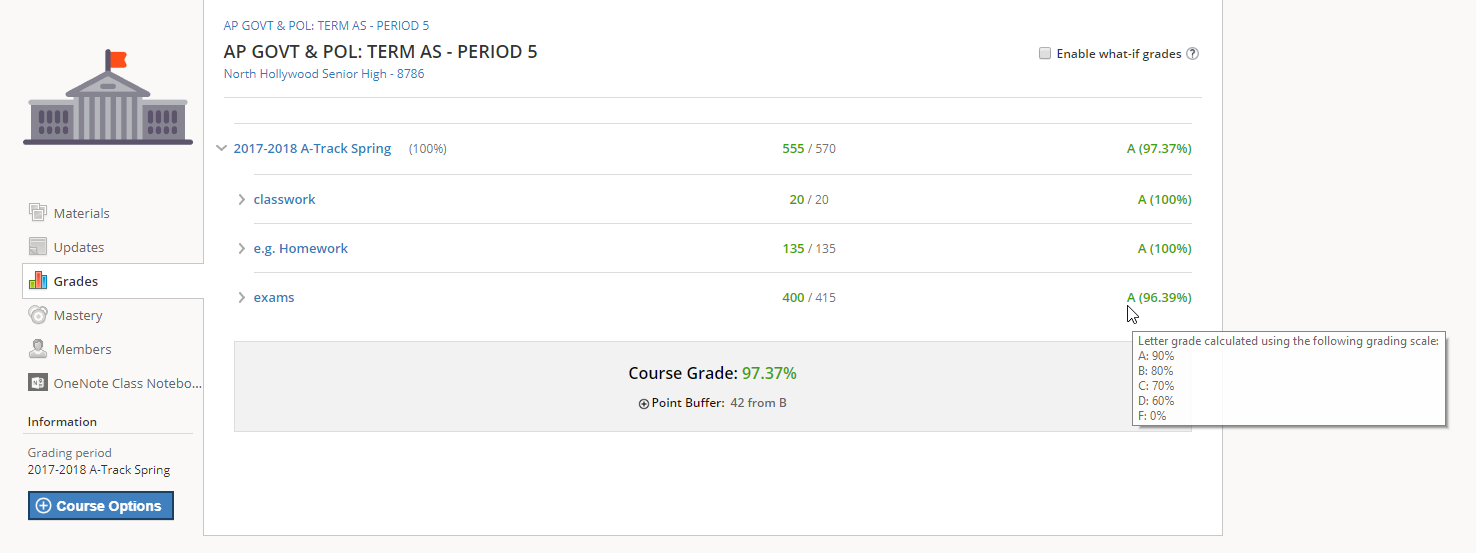
Image: Example of point totals for categories and unweighted classes. Also features calculated letter grades and point buffers.
Displays letter grades for classes that don’t provide them*
The specific score needed for each grade can be customized, see Custom Grading Scales
Point totals are displayed for classes with unweighted categories
Point totals are displayed for all assignment categories
Point totals and percentages are displayed on classes that hide them by default
Displays point buffers from the next lowest letter grade and number of points needed to reach the next highest letter grade for unweighted classes
Image: Shows percentages for each assignment as well as points possible for assignments without grades entered.
The number of possible points for an assignment is shown even when a grade has not yet been entered for that assignment
Percentages are shown for each individual assignment
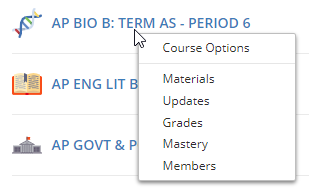
Image: Right click a class to view a context menu
Right click a class to quickly jump to a specific page or to edit that course’s settings
What-If Grades
Image: Example of locally modifying a grade. Notice the change in the category and class grade.
Allows you to locally modify the grade of an assignment
Schoology Plus will recalculate the grades for each category and for the entire class
Weighted categories are taken into account when recalculating grades
Image: Example of adding a simulated assignment
Allows you to simulate adding an assignment
Assignments can be added to any category, and can be given any grade
This allows you to see how an upcoming assignment will affect your grade with different scores
Image: Example of calculating the minimum score necessary on the final to keep an A in the class. Also demonstrates dropping and un-dropping a grade.
Allows you to calculate the minimum grade for an assignment required to reach a certain grade in the class (right click on an assignment)
Useful to see what grade you need on the final to keep your A in the class!
Allows you to simulate dropping a grade (right click on an assignment)
Desktop Notifications
Image: A desktop notification
Desktop notifications for when new grades are posted*
Extension Icon
Image: The extension icon showing the number of new grades
Extension icon shows number of new grades posted*
Clicking the extension icon will take you to:
Your notifications if you have newly posted grades
The Schoology homepage if you do not
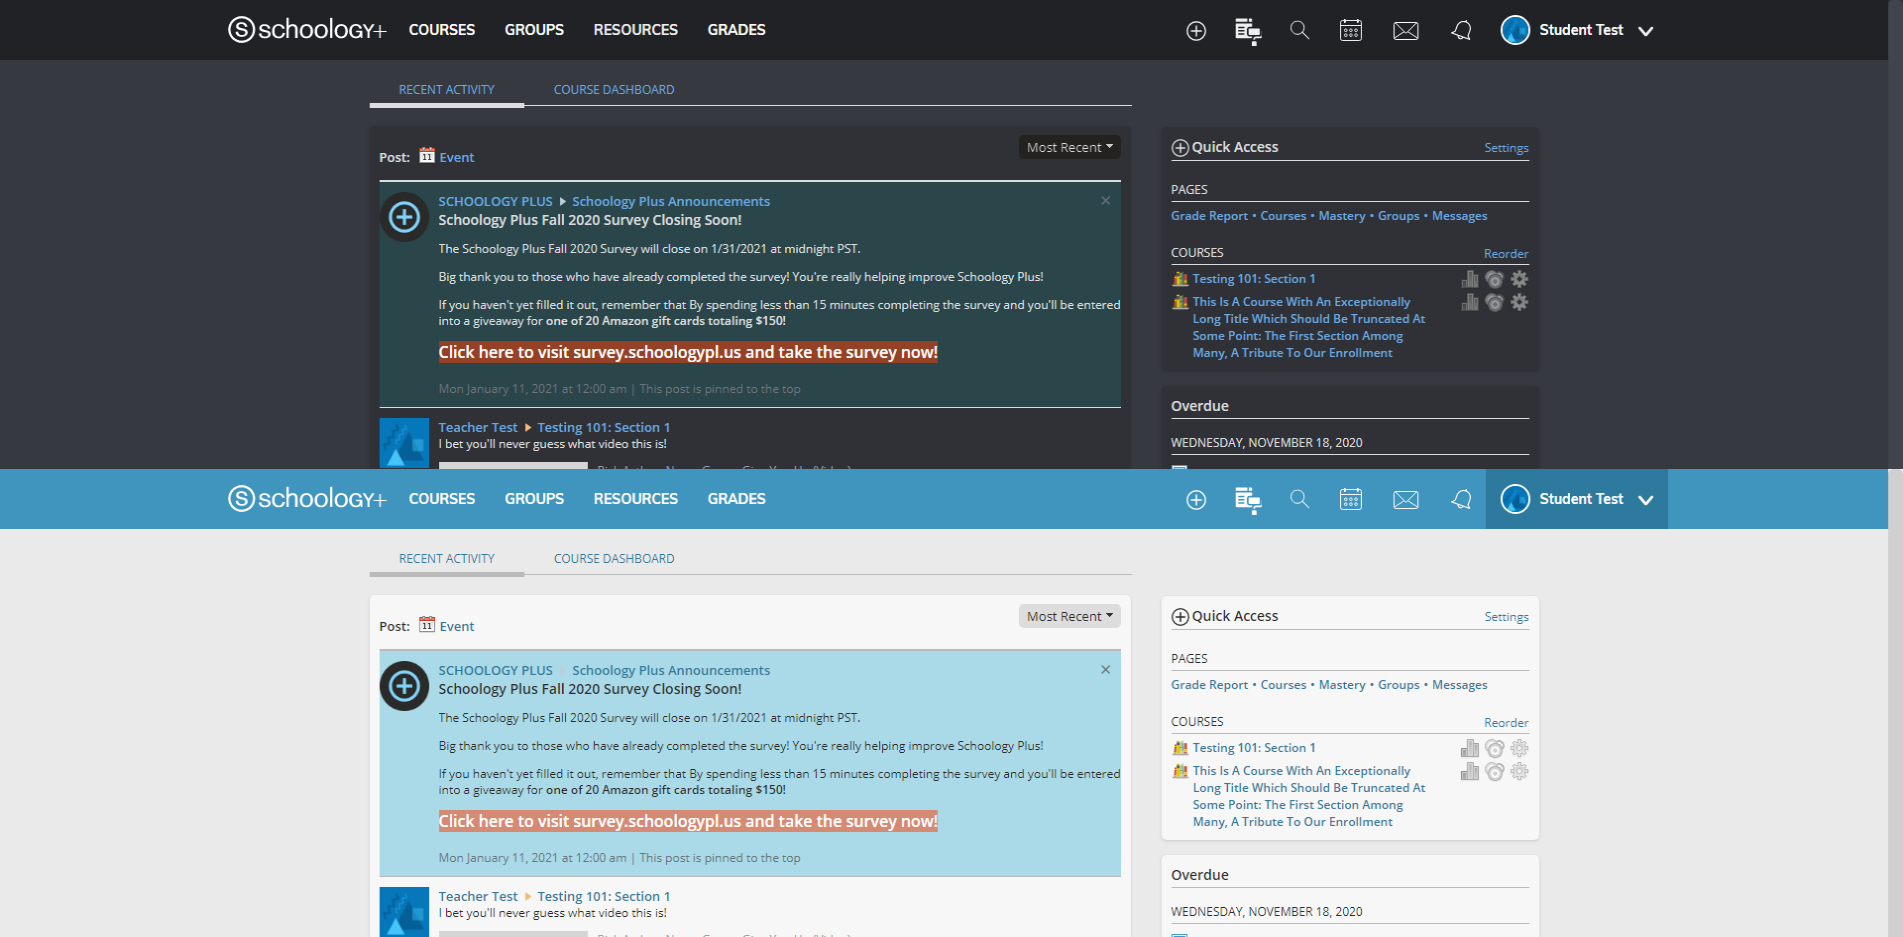
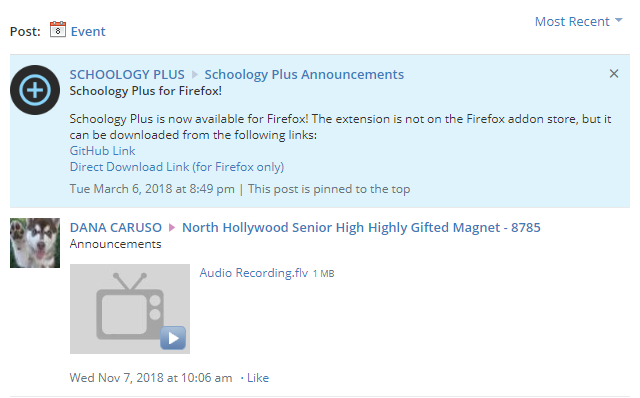
Schoology Plus Announcements
Image: An example of a Schoology Plus announcement
Announcements about Schoology Plus will be sent as desktop notifications*
They will also show as posts in your news feed*
Schoology Plus Settings
Image: The Schoology Plus settings dialog box. Click the (+) button on the navigation bar to open.
Schoology Plus has customizable settings, including but not limited to:
Theme
Sets the theme for the Schoology Plus interface. Currently, Schoology Plus has 4 built-in themes and a theme editor for you to make your own.
Desktop Notifications
Displays desktop notifications and a number badge on the extension button when new grades are entered
Custom Grading Scales
Uses custom grading scales (set per-course in Course Options) when courses don’t have one defined
Order Classes (LAUSD schools only)
Changes the order of your classes on the grades and mastery pages
Archived Courses Button
Shows a button labeled “See Archived” next to the “See All” button in the courses dropdown
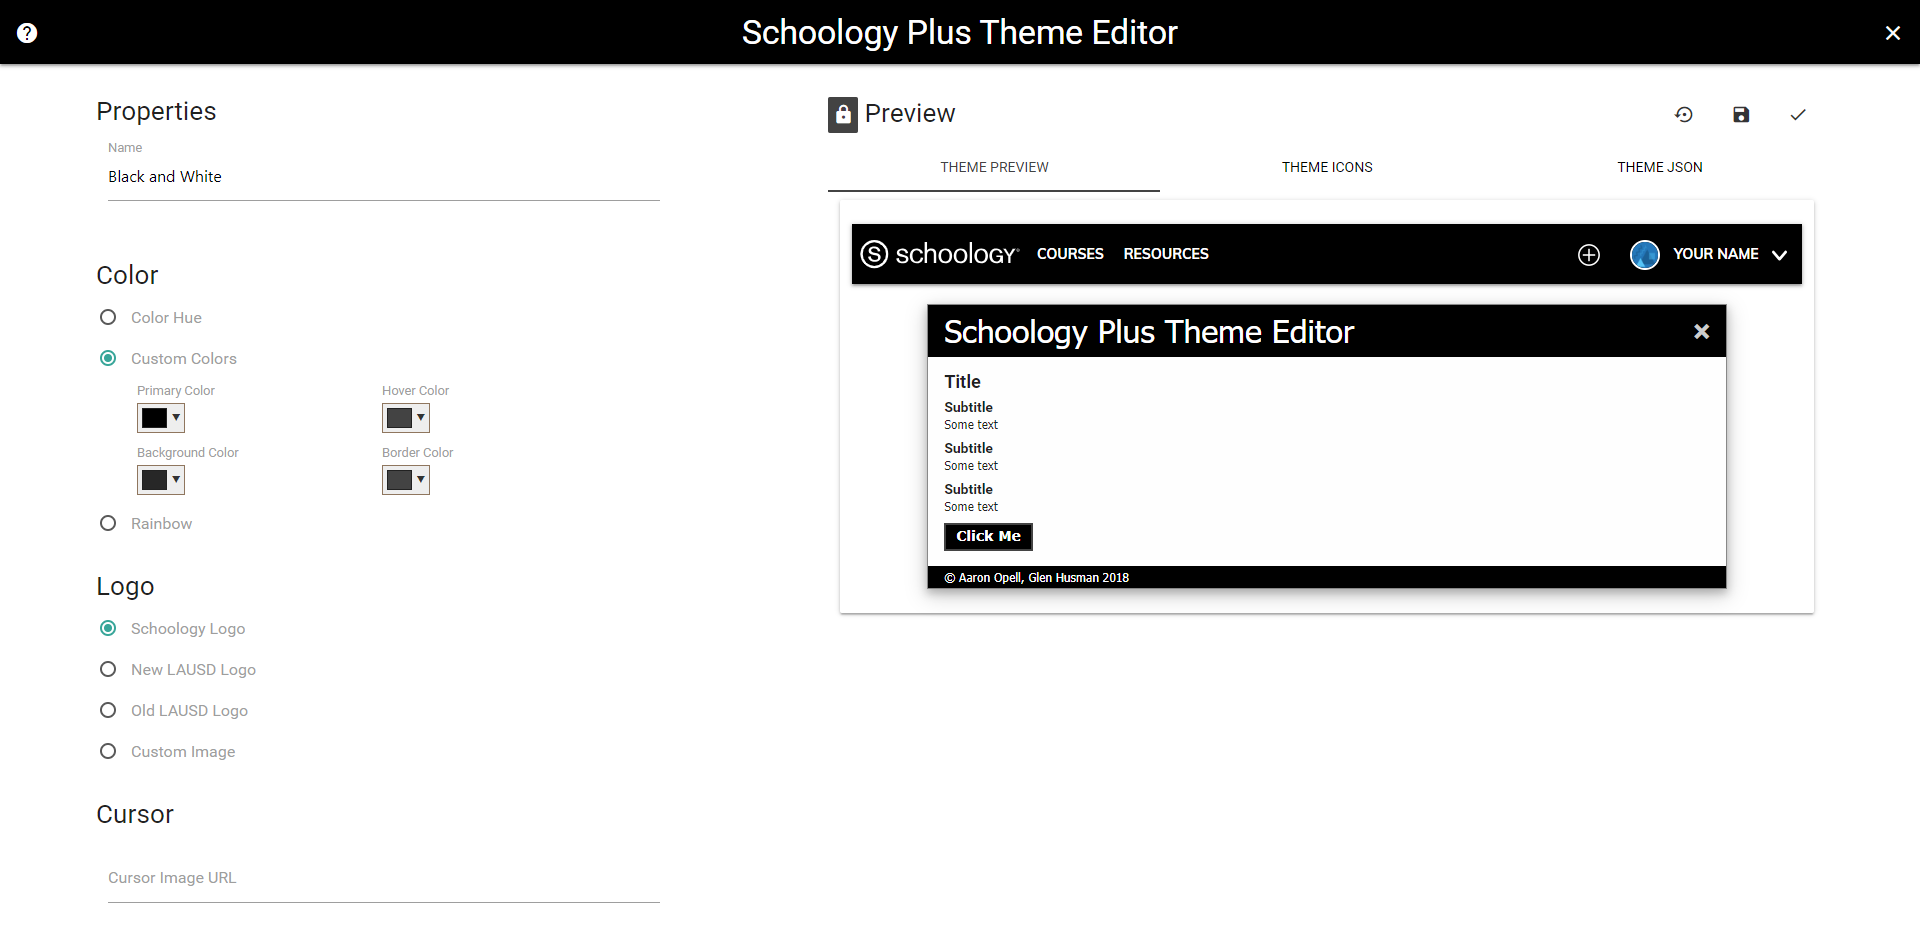
Theme Editor
Image: The theme editor interface with an example of a custom Black and White theme
Schoology Plus is equipped with a fully-featured theme editor, allowing you to create your own custom theme. The theme editor allows you to preview your changes to the interface, including colors, logos, cursors, and custom icons. To learn more about the theme editor, see the Theme Editor help page.
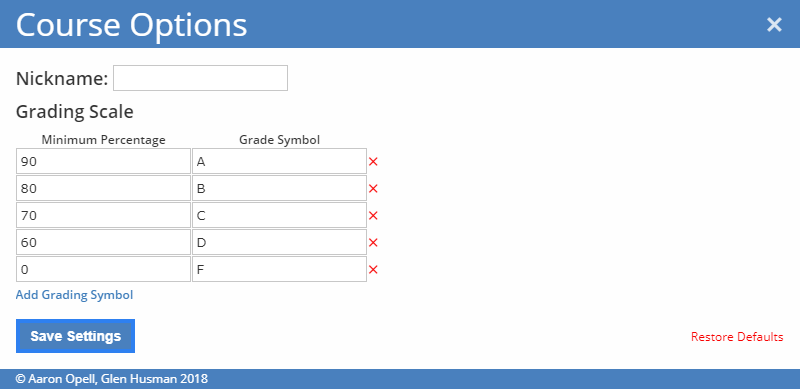
Course Options
Image: The course options dialog box. To access, click on the “Course Options” button on the sidebar of any course page.
Course Nicknames
You can set a nickname for a course, allowing you to make friendlier and nicer looking names that appear everywhere in the interface where the ugly name appeared previously.
Custom Grading Scales
You can create custom grading scales for courses where the teacher does not have a grading scale set for the class.
This will be used to calculate letter grades for assignment categories and courses on the grades page
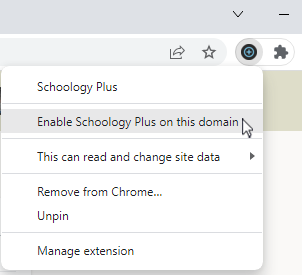
Custom Domain Support
Schoology Plus can be configured to work with your school’s custom Schoology instance. Simply navigate to the homepage of your school’s Schoology implementation, then right click the extension and select “Enable Schoolgy Plus on this domain”. This is necessary only if your school’s Schoology site is running on a domain that does not end in schoology.com. See this page for more information.
Image: The option to enable Schoology Plus for your school’s domain can be found by right-clicking the extension.
Feedback and Support Discord
Schoology Plus has a Discord server where you can offer feature suggestions, report bugs, get support, or just talk with other Schoology Plus users. Click here to join!
Contributing
Please see CONTRIBUTING.md for information about contributing to Schoology Plus. This document also includes methods for reporting bugs and submitting feature requests.
Contributors
This extension was created by Aaron Opell. Significant development assistance has been provided by Glen Husman. Various other contribution information is located in the Contributors dialog accessible via a link in the footer of Schoology Plus settings.
License
This project is open source under the MIT License. See the LICENSE file for more information.
Privacy Policy
Schoology Plus respects your privacy and will NEVER collect or sell your personally identifying information. View our full privacy policy here.
Disclaimer
Schoology Plus is not affiliated with Schoology Inc. or the Los Angeles Unified School District. Schoology, the SCHOOLOGY® wordmark, and the S logo are registered and unregistered trademarks of Schoology, Inc. in the United States. All product names, logos, and brands are property of their respective owners.


 https://github.com/FlxB2/Constraint-Based-Automated-Updating-of-Application-Deployment-Models